
How to Resize Images for Social Media in 2026
The fastest way to resize images for social is to pick a platform preset or Photofy template and export at the exact recommended pixel dimensions, keeping your subject, text, and logo inside the safe zone. That’s the whole rule. Platforms crop and recompress images that don’t match their specs, and that’s what causes blurry faces or cropped-off captions.
Here’s the two-line version you can act on right now:
- Step 1: Upload your image and select the preset or aspect ratio for the platform you’re posting to (Instagram feed, TikTok, LinkedIn banner, whatever applies).
- Step 2: Reframe so nothing important sits near the edges, then export.
Pro Tip: Always export a fresh copy for each platform instead of reusing one “universal” size. A photo cropped perfectly for Instagram Stories will chop off heads on a LinkedIn banner.
Key Takeaways
Matching each platform’s exact pixel dimensions and safe zone prevents the cropping and compression problems that make social images look unprofessional.
| Point | Details |
|---|---|
| Export at exact pixels | Use platform-recommended dimensions (like 1080 × 1350 for Instagram feed) instead of letting the site rescale a mismatched upload. |
| Protect the safe zone | Keep faces, text, and logos centered so grid crops, Reel covers, and link previews don’t cut them off. |
| Use sRGB and 85 to 92 quality | This color profile and JPEG quality range avoids visible compression artifacts after platform recompression. |
| Never upscale small originals | Start from the largest available photo and crop down rather than stretching a small image up to fit a preset. |
| Templatize with Photofy | Photofy’s presets and asset library apply the right ratio and safe zone automatically across Instagram, Facebook, TikTok, and more. |
Table of Contents
- How to Resize Images for Social Step by Step
- What Are the Best Image Dimensions for Social Media in 2026?
- How Do You Export Images Without Losing Quality?
- How to Batch Resize Images for Multiple Platforms Fast
- How Photofy Speeds Up Resizing for Every Platform
- What Actually Matters Most When Resizing for Social
- Get Platform-Ready Images Without the Guesswork
- Sources
How to Resize Images for Social Step by Step
Start with your largest available original. A photo pulled straight from a phone camera or DSLR gives you room to crop tight without losing sharpness. A screenshot or a file already compressed once will show soft edges the moment you resize it again.
Here’s the workflow that works across nearly every resizing tool, including Photofy:
- Upload the source file. JPG, PNG, and WebP all work fine as inputs. Skip anything already stretched or pixelated.
- Choose a preset or set a custom ratio. Presets save time for standard posts. Custom dimensions matter for ad creative or a client’s odd banner size.
- Reframe before you export. Drag the crop box so faces, logos, and text sit away from the corners. If you’re building a carousel, lock every slide to the same ratio, since the first slide sets the crop for the rest of the set.
- Export at the recommended pixel count, not whatever your editor defaults to.
- Verify before posting. Preview it on your phone. Check how the thumbnail looks in a feed grid and whether a Reel cover trims off your headline.
Pro Tip: Zoom into the corners of your crop before exporting. That’s where captions and logos get clipped most often, and it’s the easiest mistake to catch in ten seconds.
What Are the Best Image Dimensions for Social Media in 2026?
Every platform reads its own rulebook for cropping, and the gap between “close enough” and “exact” shows up the moment your post lands in someone’s feed. Here’s the cheat sheet worth bookmarking.
The safe-zone habit matters more than the pixel count itself. Instagram’s feed grid trims a 4:5 upload down to roughly 3:4 for the profile view, which is why keeping your subject centered protects you from both crops at once. Reels and Stories cover art gets cropped independently from the video, so a headline that looks fine while mid-scroll might vanish from the cover thumbnail entirely.
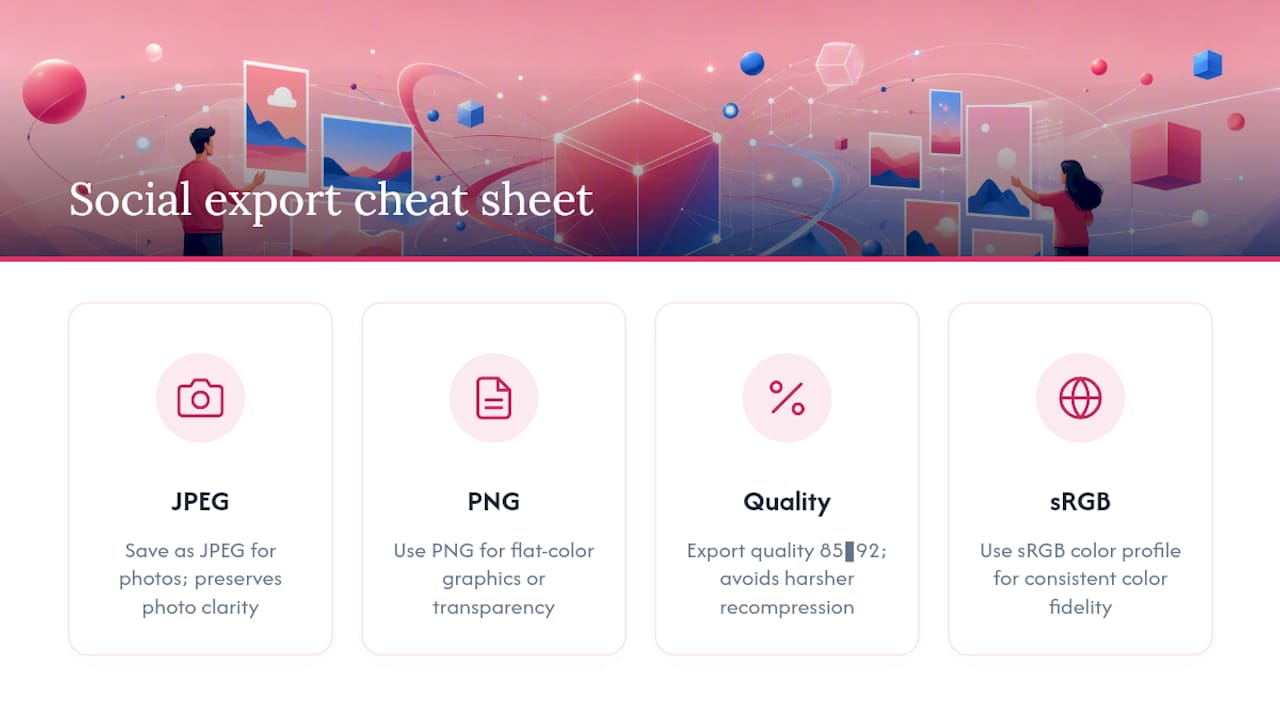
For export settings across the board: save as JPEG for photos, PNG for graphics with flat colors or transparency, use the sRGB color profile, and keep quality between 85 and 92. Exporting at the platform’s recommended pixel dimensions instead of letting the site rescale a huge original avoids the harsher recompression that turns skin tones blotchy and text edges fuzzy.
How Do You Export Images Without Losing Quality?
Format choice decides more than most people expect. JPEG handles photographs well because it compresses smoothly without visible banding. PNG holds up better for graphics, logos, and anything with flat color or text, since it preserves sharp edges and transparency that JPEG tends to smear. WebP splits the difference: smaller file sizes with photo-quality results, though not every platform’s upload tool handles it cleanly yet.
Three habits prevent most quality complaints:
- Set your color profile to sRGB before export. Other profiles can shift colors once a platform’s compression engine touches the file.
- Keep JPEG quality between 85 and 92. Anything lower shows visible artifacts around text and hard edges once the platform recompresses it a second time.
- Never upscale a small image to hit a bigger preset. Stretching a 600 × 750 photo up to 1080 × 1350 makes it softer, not sharper. Start from the largest original you have and crop down instead.
Preview the final export on your phone before you post it. Thumbnails and grid crops behave differently than a full-screen editor view, and that’s usually where a “perfect” export turns out to have a chopped-off caption after all.
How to Batch Resize Images for Multiple Platforms Fast
Batch resizing earns its keep the moment you’re posting a campaign, a product catalog, or a multi-slide carousel across three platforms at once. One-by-one editing works fine for a single post; it becomes a time sink past five or six images.
- Decide if you need consistency first. A single campaign across Instagram, Facebook, and LinkedIn usually needs identical crops and color treatment, so batch-export once you’ve locked the ratio.
- Favor tools that process locally in your browser. In-browser resizers keep files on your device instead of uploading them to a server, which matters if you’re handling client photos or unreleased product shots.
- Name your exports with a system. Something like
platform_campaign_date_size(instagram_springlaunch_0315_1080x1350) saves real time when a folder fills up with fifty near-identical files. - Run a final checklist before uploading: correct aspect ratio, safe zone respected, sRGB profile applied, filenames consistent.
Pro Tip: Export your ZIP folder by platform, not by image. A folder labeled “Instagram_batch” you can drag straight into a scheduler beats hunting through one giant folder of mixed sizes.
How Photofy Speeds Up Resizing for Every Platform
Photofy builds platform-ready sizing into its templates instead of leaving you to calculate pixel dimensions by hand. Choose a template, drop in your image, and the aspect ratio, safe zones, and export settings are already set for the platform you picked.
- Presets cover Instagram, Facebook, TikTok, and more, so switching platforms doesn’t mean starting from a blank canvas.
- The built-in asset library and text overlays let you build a Reel cover or a feed post without leaving the app.
- White-label controls keep sizing and branding consistent across a whole team, which matters once more than one person is posting under the same account.
Getting the crop, ratio, and safe zone right on the first try is what separates a five-minute export from a twenty-minute one spent re-uploading the same photo three times.
For video specifically, Photofy’s video aspect ratios cheat sheet breaks down Reel, Story, and feed video specs in one place, and the personal plan gives individual creators access to the same preset system enterprise teams use.
What Actually Matters Most When Resizing for Social
Most advice on this topic treats every platform’s spec sheet as equally important, and that’s where creators waste time. The truth is simpler: getting the aspect ratio and safe zone right matters far more than chasing the exact pixel count to the decimal. A 1080 × 1350 export and a 1080 × 1346 export will look identical to a viewer. A face cropped out of frame because nobody checked the safe zone will not.
The conventional workflow, resize once and hope it works everywhere, breaks down the moment you’re posting to more than one platform. Instagram’s grid crop, TikTok’s bottom-third UI overlap, and LinkedIn’s link-preview ratio all pull at your image differently. Treating each platform as its own export, not a resize of the last one, is the habit that actually prevents rework.
If there’s one thing worth prioritizing first, it’s building a repeatable template rather than resizing from scratch every time. Creators who set up presets once, whether in a free browser tool or inside Photofy, stop thinking about pixels entirely and start thinking about the actual content.
— Jon
Get Platform-Ready Images Without the Guesswork
Free resizers handle one image at a time well enough, but they leave you rebuilding the same crop, safe zone, and color settings for every new post and every new platform. Photofy skips that repetition by baking platform specs into ready-made templates, so a single upload can become a properly sized Instagram post, Facebook link image, and LinkedIn banner in a few clicks instead of three separate edits.
That’s a real advantage for creators juggling multiple accounts or small teams keeping branding consistent across channels, since the asset library and white-label controls mean nobody has to remember the right pixel count from memory. If you’re posting to more than one platform regularly, start with Photofy’s personal plan and build your first template today.
Sources
For deeper platform specs, see the Instagram post size guide, Designkit’s Instagram image guide, and Facebook’s full resize sizing chart. For social ad creative strategy, Reddog Consulting Group’s advertising guide covers how image specs affect performance. Photofy’s video aspect ratios cheat sheet rounds out video-specific sizing.
- Instagram Post Size Guide 2026: Every Format and Safe Zone
- Instagram Image Size Guide 2026: Post, Reel, Story & Carousel Specs | Designkit
- Resize for Facebook: Free Image Resizer for Posts & Ads | ResizeOn