

Under 2 Minutes: Add a Logo Watermark for Photographers & Teams
The fastest way to watermark a photo: place a transparent PNG logo on its own layer, position it in a corner, set opacity between 30% and 70%, and export as PNG or WebP. That single-image method takes under two minutes in most editors. For dozens or hundreds of photos, a reusable preset or a platform like Photofy handles the repetition without wrecking image quality.
TL;DR:
- Using a fixed corner watermark at 10% to 20% of image width with 30% to 70% opacity is most effective for clear, subtle branding without distracting from the image.
- Batch watermarking benefits from preset templates in Lightroom or browser tools, but it requires testing and backups to avoid misapplied or unwanted edits.
- Export formats should be PNG or WebP to preserve transparency; high-quality JPGs are suitable for social media, while HEIC images must be converted before watermarking.
- A diagonal tile pattern at 20% to 35% opacity offers stronger control against cropping but can hurt visual appeal for public portfolios.
- A simple, high-contrast logo designed for small sizes enhances watermark readability, and multiple versions help adapt to different backgrounds and lighting conditions.
Table of Contents
- Which Watermarking Method Fits Your Situation?
- How Do You Add a Logo Watermark to a Single Photo?
- How Do You Watermark Dozens of Photos Without Burning an Afternoon?
- What File Format Should You Export a Watermarked Photo In?
- What Size and Placement Actually Work for a Watermark?
- How Do You Add a Watermark Logo on an iPhone?
- Why Do Teams Use a Platform Instead of Editing Each Photo by Hand?
- How Do You Design a Logo That Actually Works as a Watermark?
- Is Watermarking Your Photos a Legal Protection?
- Can You Change a Watermark’s Look for Different Photos?
- How Do You Stop People From Cropping Out Your Watermark?
- What’s the Smartest Way to Choose a Watermark Strategy?
- Try Photofy for Branded Photos That Publish Themselves
- Sources
- FAQ
Which Watermarking Method Fits Your Situation?
Not every job calls for the same tool. A single wedding photo you’re posting tonight needs something different than 400 listing photos for a real estate client.
Four approaches cover almost every situation:
- Browser-based editors work best for one-off jobs. Many run client-side, meaning your images never leave your device, which matters if you’re watermarking anything sensitive.
- Desktop software (Photoshop, GIMP, Affinity Photo) gives you the most control over layers, blending modes, and precise pixel placement.
- Mobile apps let you watermark on the go, right after a shoot, before you even sit down at a computer.
- Export presets in tools like Lightroom apply a saved watermark automatically to every file in a batch, no manual placement required.
Before picking a lane, ask yourself three questions: Do you need to process more than 20 images at once? Do you want a saved preset you’ll reuse weekly? And do you need to keep an unwatermarked master file for print or client delivery? If you answered yes to the second or third question, skip the browser tool and go straight to a preset-based workflow.
How Do You Add a Logo Watermark to a Single Photo?
Start with a clean, transparent-background logo. A PNG (or WebP) file with an alpha channel is non-negotiable here. JPG files flatten transparency, so a logo saved as JPG will show up with an ugly white or black rectangle behind it instead of blending into the photo.
Once your logo file is ready:
- Open your photo and import the logo as a new layer above it.
- Use a 9-grid anchor system (top-left, center, bottom-right, and so on) to position it. Bottom-right is a commonly used corner for watermark placement due to its conventional and unobtrusive position.
- Resize the logo to roughly 10% to 20% of the image width. Any bigger and it starts competing with your subject.
- Set the layer opacity to a level that balances visibility and subtlety, typically moderate so the watermark is noticeable but not distracting.
- Add a slight rotation (5 to 10 degrees) if you want a more casual, stamped look, though this is optional.
- Export a copy as PNG or WebP, keeping your original master file untouched and unwatermarked.
- Rename the exported file clearly, like
photoname_watermarked.png, so you never confuse it with the master.
Check your result on both a phone screen and a desktop monitor before publishing. A watermark that looks perfectly legible on a 27-inch monitor can vanish into a thumbnail on Instagram.
Pro Tip: Duplicate your logo layer once and save it as a Photoshop or GIMP template file with the opacity and position already set. Next time, you just drag in a new photo underneath instead of rebuilding the layer from scratch.
How Do You Watermark Dozens of Photos Without Burning an Afternoon?
Batch work only makes sense once you’ve built a repeatable template. In Lightroom, that means saving a watermark preset with your logo, opacity, and placement locked in, then applying it during export to an entire folder in one pass. Browser-based batch tools work the same way: set your watermark once, then run it across a folder of images automatically.
A few rules keep batch runs from going sideways:
- Test the preset on 3 to 5 sample images first, and check every corner and edge before committing to the full folder.
- Keep your originals backed up in a separate folder so a bad batch run never touches your masters.
- Decide upfront whether to preserve or strip EXIF and GPS data. Preserving it helps with attribution and organization; stripping it protects the privacy of anyone photographed at a specific location, and some tools let you strip GPS while keeping other metadata intact.
- Switch to diagonal tile mode for proofs or unpaid previews, since a repeated watermark across the frame can’t be cropped out the way a single corner mark can.
What File Format Should You Export a Watermarked Photo In?
PNG and WebP are the only formats that reliably preserve the transparency your logo needs to blend into a photo. Export a watermarked image as JPG and any non-transparent area of your logo shows up as a visible box, ruining the effect.
That said, JPG still has a place. For social media posts where file size matters more than perfect transparency edges, exporting your already-flattened watermarked image as a high-quality JPG (85% to 90% compression) keeps load times fast without visible quality loss.
- Web and blog use: PNG, quality set to preserve transparency, moderate compression.
- Social media posts: JPG at 85% to 90% quality after the watermark is already flattened into the image.
- Client proofs: WebP for smaller file sizes with transparency intact.
One caveat for iPhone users: photos captured in HEIC format need converting to PNG, JPG, or WebP before most watermark tools will accept them. Always keep a full-resolution, unwatermarked master in your camera roll or cloud backup, regardless of which format you export the branded copy in.
What Size and Placement Actually Work for a Watermark?
Size and opacity decisions come down to one trade-off: subtle branding versus visible theft deterrence. You rarely get both from the same setting.
- Corner watermarks should run about 10% to 20% of the image width, based on practical sizing guidance from working photographers.
- Tiled, diagonal watermarks work best smaller, around 8% to 12% per repeat, since the pattern itself does the deterring rather than any single mark’s size.
- Opacity for corner marks should sit between 30% and 70%. Tiled marks look better lower, around 20% to 35%, so the pattern doesn’t overwhelm the photo underneath.
- Bottom-right corner placement is the default for a reason. It reads as intentional branding rather than an accident, and it rarely covers a subject’s face or the focal point of a composition.
- Reserve center placement for paid proofs or preview galleries where you want the mark unmissable. Effective watermarking balances legibility with aesthetics, and a big, centered, fully opaque logo tends to fail that balance for anything meant to look polished.
Pro Tip: If you shoot both portrait and landscape orientations, save two versions of your watermark preset with different anchor points. A bottom-right mark on a portrait shot can end up sitting right on a subject’s shoulder.
For anyone building a consistent brand look across dozens of posts, visual storytelling and presentation choices matter just as much as the watermark itself. A logo that’s technically well-placed but clashes with your photo’s color palette still hurts the final result.
How Do You Add a Watermark Logo on an iPhone?
You don’t need a desktop to get a clean watermark. Most photo editing apps on iPhone support layers, opacity sliders, and PNG imports, which is really all you need.
- Open your photo in an editing app that supports image layers (many free apps handle this).
- Import your transparent PNG logo as an overlay on top of the photo.
- Drag to position it, then pinch to resize (aim for the same 10% to 20% width guideline as desktop).
- Adjust the opacity slider, usually somewhere in the app’s layer settings, to 30% to 70%.
- Export the result as a new file, keeping your original HEIC photo untouched in your camera roll.
- Check the resolution of the exported copy. Some apps quietly downscale images during export, and you don’t want a blurry final image.
For a handful of photos, mobile works fine. Once you’re past 15 or 20 images from the same shoot, move to desktop or a batch tool instead. Doing them one by one on a phone screen gets tedious fast, and it’s easy to place logos inconsistently across a set.
Why Do Teams Use a Platform Instead of Editing Each Photo by Hand?
Once you’re publishing branded photos across multiple channels every week, manual watermarking stops scaling. A platform with saved templates and a shared asset library lets you apply the same logo placement, opacity, and sizing across every image without rebuilding the layer each time.
This matters most for small businesses, agencies, and franchise teams where multiple people post content and brand consistency can’t depend on everyone remembering the same settings. Photofy’s personal solutions let individuals set up a watermark template once and reuse it across every post, while teams needing centralized control can lean on shared brand assets instead of passing files back and forth.
How Do You Design a Logo That Actually Works as a Watermark?
A logo built for a business card or website header often fails as a watermark. Dense detail, thin lines, and small text disappear at 15% opacity or shrink into an unreadable blur at 10% image width.
Design your watermark logo with simplicity as the priority. A single-color silhouette, initials, or a simplified icon version of your full logo reads clearly at small sizes and low opacity, where a detailed, multi-color version turns into a smudge. If your brand logo has fine text or intricate line work, create a simplified variant specifically for watermarking rather than shrinking your full logo down and hoping it holds up.

Contrast matters more than most people expect. A white or light-colored logo works on darker photos, but the same mark disappears against a bright sky or pale background. Many photographers and small businesses keep two versions of their watermark logo on hand, one light and one dark, and choose whichever contrasts better with the photo underneath. Some editing tools even let you set a subtle drop shadow or thin outline around the logo so it stays visible regardless of what’s behind it, without needing to bump opacity so high that it distracts from the subject.
Test your watermark against at least five different photos before locking in a final design. A mark that looks great on a bright outdoor shot might vanish on a moody, dark portrait. If you find yourself needing wildly different opacity settings depending on the photo, your base design probably needs simplifying rather than your settings needing constant adjustment.
Is Watermarking Your Photos a Legal Protection?
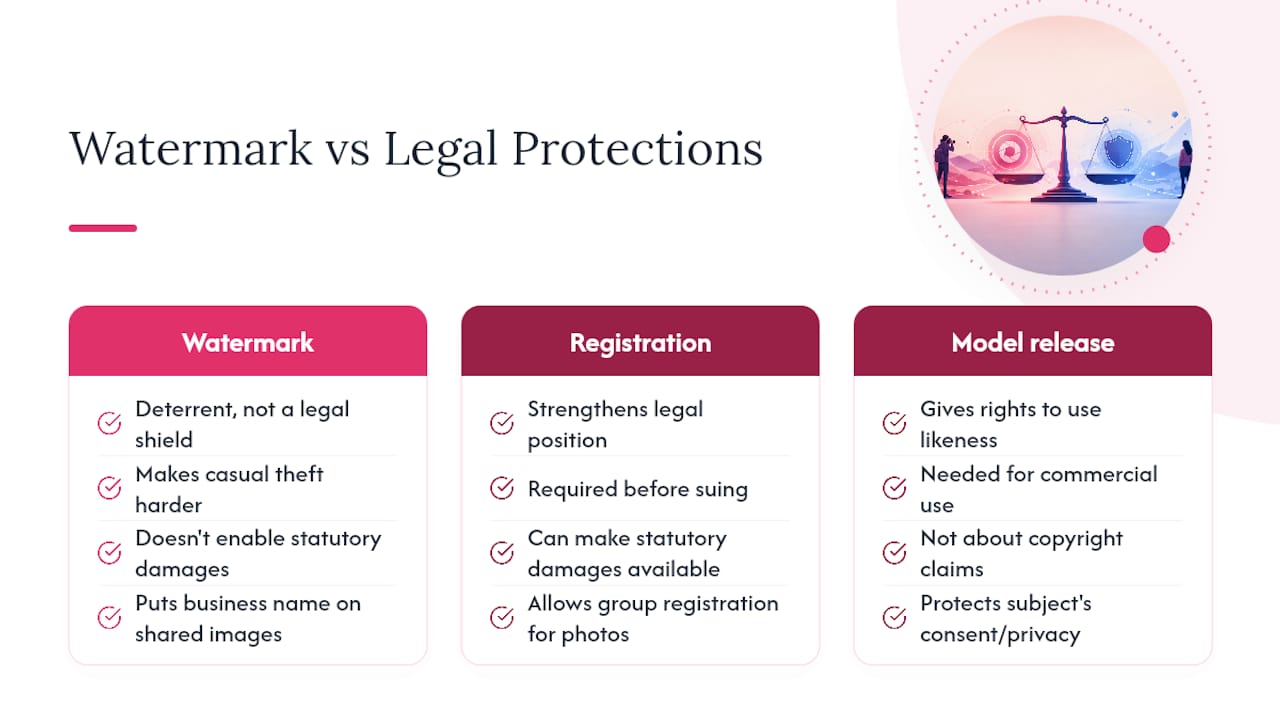
A watermark is a deterrent, not a legal shield. Copyright protection in the United States exists automatically the moment you create an original photo, whether or not it carries a visible mark. Registering that copyright with the U.S. Copyright Office is what actually strengthens your legal position if someone uses your image without permission, since registration is generally required before you can sue for infringement and can make you eligible for statutory damages.
What a watermark does accomplish is practical, not legal: it makes casual, low-effort theft harder and it puts your business name in front of anyone who shares the image, even without permission. A visible logo also signals ownership to anyone considering using the photo, which can discourage the kind of casual “right-click and repost” behavior that happens on social media far more often than deliberate, large-scale infringement.
Where legal issues get complicated is when you’re watermarking someone else’s face or private property. Adding your business logo to a photo doesn’t give you the right to use someone’s likeness commercially if you don’t already have a model release. Watermarking protects your claim to the image itself; it says nothing about whether you had permission to photograph or publish the subject in the first place.
If your business relies heavily on photo licensing or sells prints, consider registering your copyright in batches (the Copyright Office allows group registration for photographs) rather than treating the watermark alone as sufficient protection.
Can You Change a Watermark’s Look for Different Photos?
Using the exact same opacity and placement on every single photo is convenient but not always smart. A dark, moody landscape and a bright, high-key portrait rarely look good with identical watermark settings.
The simplest way to customize dynamically is to build two or three preset variations instead of one: a light-logo version for dark photos, a dark-logo version for bright photos, and a lower-opacity version for images where the subject sits close to your usual placement corner. Save each as its own export preset in Lightroom or as a separate template in a browser tool, then pick the right one at export time based on a quick visual check.
Placement should shift with composition too. A tightly cropped portrait might need the watermark nudged to a different corner than a wide landscape shot, simply because the subject’s position changes where negative space falls in the frame. Rather than manually adjusting every image, some photographers keep four positioned versions of their watermark ready (one per corner) and drop in whichever one lands in the emptiest part of the frame.
For businesses posting across multiple platforms, dynamic customization also means matching opacity to the platform itself. A photo destined for a printed proof sheet can carry a bolder, more visible mark than the same photo heading to Instagram, where a heavy watermark competes with the platform’s own UI elements and captions. Building this kind of platform-specific variation into your workflow from the start saves you from re-editing images after the fact.
How Do You Stop People From Cropping Out Your Watermark?
Corner watermarks are convenient, but they’re also the easiest kind to remove. Anyone with basic editing skills can crop a corner mark out of a photo in seconds, which is exactly why tiled, diagonal watermarks exist as an alternative for images you’re genuinely worried about losing control of.
A diagonal tile pattern repeats your logo across the entire frame at a lower opacity, usually 20% to 35%. Because the mark touches every part of the image, cropping it out means cropping out most of the photo too, which defeats the purpose of stealing it in the first place. This approach works best for proofs, paid preview galleries, and any image you’re sharing before a client has actually purchased or licensed it.
For photos you’re publishing publicly and permanently, like a finished portfolio piece, a full tile pattern is usually overkill and hurts the visual appeal more than it helps. A single, well-placed corner mark paired with copyright registration covers most everyday branding needs. Save the aggressive tiled approach for situations where unauthorized use is a real, specific risk, not a general one.
Beyond the watermark itself, embedding copyright metadata directly into the image file (through IPTC fields) gives you a second layer of proof of ownership that survives even if someone manages to edit out the visible mark. It won’t stop theft, but it strengthens your case if you ever need to prove the image was yours.
What’s the Smartest Way to Choose a Watermark Strategy?
Match your watermark to your goal, not to a single “correct” formula. Subtle corner marks work for public sharing and portfolio pieces; tiled patterns belong on proofs and unpaid previews. Keep an unwatermarked master file of everything, always, and test every export on the actual platform where it will live before you call it finished.
— Jon
Try Photofy for Branded Photos That Publish Themselves
Photofy gives you what a one-off editing app can’t: a saved watermark template that applies consistently across every photo your business posts, without rebuilding the layer each time. Instead of juggling separate apps for editing, watermarking, and scheduling, you handle branding and publishing from the same platform.

That matters most if you’re posting frequently across multiple channels and need every image to carry the same logo placement and opacity without manual rework. Photofy’s template library and asset management let individuals and small teams apply a branded watermark once and reuse it indefinitely, while its white-label options give agencies and franchises centralized control over how every location or team member brands their content. If you’re managing a growing photo library and getting tired of repeating the same manual steps, check out Photofy’s personal solutions and see how a saved template compares to editing each photo by hand.
Sources
- Watermark Photo Tool
- Add logo to image — Appkiro
- How to make a watermark — ExpertPhotography
- Add Logo to Image — TheToolApp
FAQ
Why Is There a Watermark on My Photos?
A watermark usually means the photographer or platform added a logo or text mark to protect their work and promote their brand before you’ve licensed or purchased the full-resolution image.
Should You Put a Watermark on Your Photos?
Watermarking helps with branding and deters casual theft, but it’s not a substitute for copyright registration if you need real legal protection against unauthorized use.
How Do I Add a Watermark Logo to a Photo on My iPhone?
Open your photo in an editing app that supports layers, import your transparent PNG logo, resize and position it, adjust opacity, and export a new copy while keeping your original photo untouched.